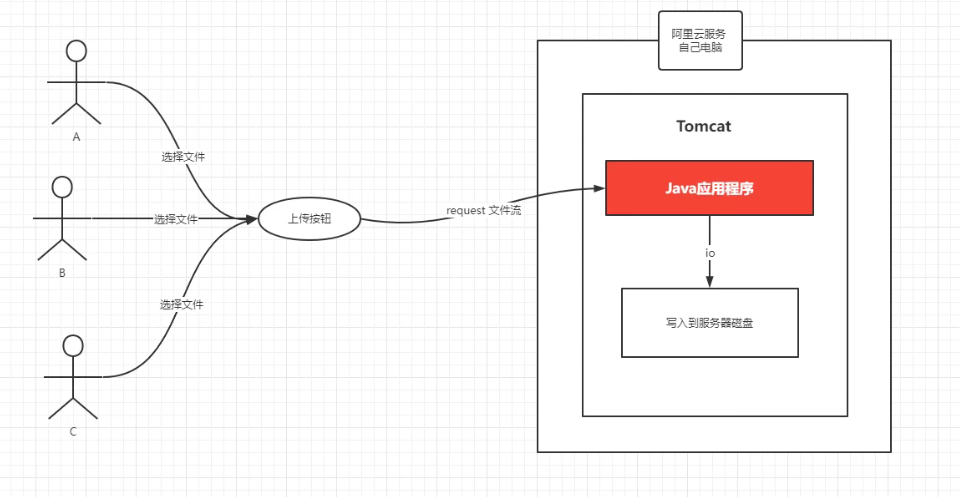
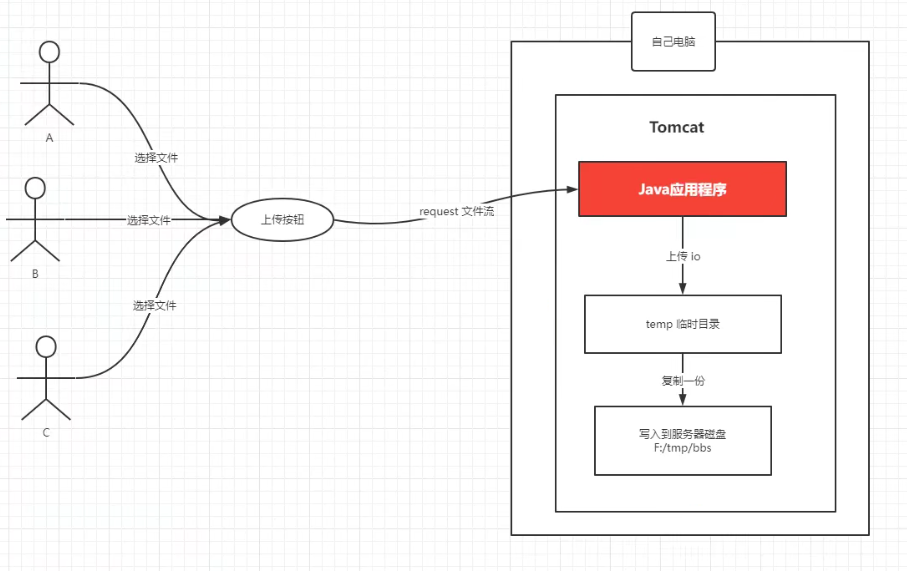
关于文件上传 概述 文件上传,是程序开发中必须会使用到的一个功能,比如:
添加商品,用户头像,文章封面等需求 富文本编辑器(插件文件上传) 文件上传的原理是什么? 为什么要实现文件上传,就是要共享资源,大家都可以看你的平台上上传的文件。就一句话,把用户自己电脑中的文件,通过程序上传到服务器的过程。
其实就是一句话:把用户的文件通过 Java IO 流复制到服务器的过程,称之为文件上传。
使用 Springboot 如何实现文件上传呢? 实现步骤 1、搭建一个springboot工程 2、准备一个文件上传需要的页面 在resources/templates目录下新建一个upload.html
3、实现后台的文件上传 定义一个文件上传的service
1
2
3
4
5
6
7
8
9
10
11
12
13
14
15
16
17
18
19
20
21
22
23
24
25
26
27
28
29
30
31
32
@Service public class UploadService public String UploadImg (MultipartFile file,String dir) new File("D://tmp/" + dir);try {if (!targetFile.exists()){new File(targetFile, file.getOriginalFilename());return "ok" ;catch (IOException e) {return "error" ;
定义一个文件上传的controller
@PostMapping("/upload/file") @ResponseBody public Map<String, Object> upload (@RequestParam("file") MultipartFile file, HttpServletRequest request) if (file.isEmpty()) {return null ;"dir" );return uploadService.UploadImg(file, dir);
定义一个html页面
1 2 3 4 5 6 7 8 9 10 11 12 13 14 15 16 17 18 <!doctype html > <html lang ="en" > <head > <meta charset ="UTF-8" > <meta name ="viewport" content ="width=device-width, user-scalable=no, initial-scale=1.0, maximum-scale=1.0, minimum-scale=1.0" > <meta http-equiv ="X-UA-Compatible" content ="ie=edge" > <title > 文件上传</title > </head > <body > <h1 > 文件上传</h1 > <form action ="/upload/file" enctype ="multipart/form-data" method ="post" > <input name ="dir" value ="bbs" > <input type ="file" name ="file" > <input type ="submit" value ="文件上传" > </form > </body > </html >
点击文件上传按钮,在后台看到如下的代码
springmvc中文件上传提供了包装对象:MultipartFile,原理如下
4、指定文件的上传目录 配置 springboot 静态资源存储服务,将上传的文件放入指定的目录中
1 2 3 4 5 6 7 8 9 10 11 12 13 14 15 16 17 18 19 20 21 22 23 24 25 26 27 28 29 30 31 32 33 34 35 36 37 38 39 40 41 42 43 44 45 46 47 48 49 50 51 @Service public class UploadService @Value("${file.upload}") public String uploadPath;@Value("${file.domain}") private String domain;public Map<String, Object> UploadImg (MultipartFile file, String dir) try {"." ));new SimpleDateFormat("yyyy-MM-dd" );new Date());new File(uploadPath + dir, datePath);if (!targetFile.exists()) {new File(targetFile, fileName);"/" + datePath + "/" + fileName;new HashMap<String, Object>();"url" , url);"size" , file.getSize());"fileName" , fileName);"imgSuffix" , imgSuffix);return map;catch (IOException e) {return null ;
5、通过http请求服务资源 springboot如何去指定任意目录作为作为资源的访问目录?
springboot有一个目录,static这个目录其实就是静态资源目录,这个目录下面的文件是可以通过http直接访问的,但是程序一般都是打成 jar 包,我们没办法去文件写入到这个static目录下,所有springboot提供静态资源目录的额外映射机制,就是静态资源服务映射。它就类似于:nginx 的静态资源映射。
01、配置静态资源服务的映射 yml配置:
file:
  upload: D://tmp/
  publicUrl: /image/**
  domain: http://localhost:8077/image/
配置类:
@Configuration public class WebMvcConfig implements WebMvcConfigurer @Value("${file.upload}") public String uploadPath;@Value("${file.publicUrl}") public String publicUrl;@Override public void addResourceHandlers (ResourceHandlerRegistry registry) "file:" + uploadPath);
核心代码:
registry.addResourceHandler("访问的路径" ).addResourceLocations("上传资源的路径" );
6、对文件上传的思考和优化,控制 比如文件的格式 比如文件的大小 比如文件的重命名 比如文件的目录分类 


