本笔记是本人在开发中遇到的问题,由于此前未接触过,故此记录,方便以后的自己查看
相关方法解读 页面跳转(路由) 示例:
定义一个事件,点击触发方法
<a-menu-item>
下方定义相对应的方法
handleClassInstance (row )console .log('row.id >>' , row.id)this .$router.push({ path : '/course-management/case-study' , query : { id : row.id } })
具体实现过程 :
List页面
跳转到对应的页面之后,以新增方法为例
替换掉系统自带的新增按钮
<a-button @click='handleAdd({courseId:filters.courseId})' v-if='filters.courseId!=null' type='primary' icon='plus'>新增</a-button>
下方 methods 中加入以下代码
initPageParams (if (this .$route.query && this .$route.query.id) {const id = this .$route.query.idObject .assign(this .filters, { courseId : id })
From页面
在表单页加入一个 input输入框,用来接受传过来的 课程id,设置 隐藏
<a-input-number v-model='model.courseId' hidden />
在下方JS代码中,Props代码块里定义一个 courseId
courseId: {type : String ,default : null
在下方 methods 里,修改系统自带的添加方法
add (v )console .log('add >> F' , v)const module = {courseId : v.courseId ,moduleName : v.moduleName ,moduleTitle : v.moduleTitle ,Object .assign(this .modelDefault, module )this .edit(this .modelDefault)
v 是什么,….暂时不知道这是从哪里来的
Modal页面
最后在 modal页面修改一下 ==add==方法
add (v) {console .log('add >> M' , v);this .visible=true this .$nextTick(()=> {this .$refs.realForm.add(v);
致此大功告成。
配置老师课程权限 用到了插槽,就是在 表格 的那个页面,点击某一字段的值,会出来一个弹窗,然后选择对应的权限
1、首先在合适的位置加入代码,模板都类似,相差不是特别大
注意: slot的名字就是插槽的名字,下方会使用
<template slot='coursePower' slot-scope='text,record'>
2、在<a-table></a-table>外面,加入以下代码
1 2 3 4 5 6 7 8 9 10 11 12 13 14 15 16 17 18 19 20 21 22 <j-modal
3、在列表显示的地方加入代码
{title :'课程权限' ,align :"center" ,dataIndex : 'coursePower' ,scopedSlots : { customRender : 'coursePower' }
4、弹窗之后里面的具体实现等等根据实际情况编写
页面排序 在 前端列表 页面加入以下代码即可
sorter: true ,customRender :function (text ) return !text?"" :(text.length>20 ?text.substr(0 ,20 ):text)
二者缺一不可!
示例:
{title :'创建时间' ,align :"center" ,sorter : true ,dataIndex : 'createTime' ,customRender :function (text ) return !text?"" :(text.length>20 ?text.substr(0 ,20 ):text)
自定义下拉框查询 参考链接:https://blog.csdn.net/zhengtornado/article/details/106979079
控制器里写相关查询代码
查询页面
前端页面
:key="index.toString()",这段代码去掉会报错
<a-col :xl="6" :lg="7" :md="8" :sm="24">
data()里定义以下参数
projectNameList:[],teacherName :'' ,index :'' ,
url 里写入对应控制器的路径
teacherList:'/School/TeacherList'
methods 里面定义
getName (this .url.courseList).then((res ) => {if (res.success){this .projectNameList=res.result;console .log(this .projectNameList)
添加页面
<a-col :span="24">
modal里定义相应的值
projectNameList:[],
其他与添加时一样。
超长文本截取 1、引入相关组件
import JEllipsis from '@/components/jeecg/JEllipsis'
2、在components里加入
3、在 data() 与 return{}中间加入
let ellipsis = (v, l = 20 ) => (<j-ellipsis value ={v} length ={l}/ >
4、在想要截取的字段下方加入
customRender:(t ) => ellipsis(t)
完成!
参考链接:https://blog.csdn.net/github_39019743/article/details/105274552
字典遇到过的问题 前几天遇到了一个问题 ,查询结果一直显示为 null
xxx_dictText 就是这个字段,后来发现是实体类的原因,用字典注解的这个字段,首字母是大写的。于是我便改为小写实验了一下,竟然成功了。
总结:字典的实体类字段 首字母尽量不要用大写 ,否则可能会造成某些异常问题。
时间范围查询 由于是自己重写的方法,所有没有调用系统自带的那些查询条件,就摸索了一套解决方案。
<if test ="teaCourseRecordVo.classUpTime_begin != null and teaCourseRecordVo.classUpTime_begin != '' and teaCourseRecordVo.classUpTime_end != null and teaCourseRecordVo.classUpTime_end != ''" > </if >
xml 里的具体格式就是这样,相对于的前端代码如下
<a-col :xl="10" :lg="11" :md="12" :sm="24">
注意:需要导入组件
import { filterObj } from '@/utils/util' import moment from 'moment' components : {
定义参数:
queryParam : {createTimeRange :[],
用到的方法
1 2 3 4 5 6 7 8 9 10 11 12 13 14 15 16 17 18 19 20 21 22 23 24 25 26 27 28 29 30 31 32 33 getQueryParams (var param = Object .assign({}, this .queryParam, this .isorter)this .getQueryField()this .ipagination.currentthis .ipagination.pageSizedelete param.classUpTime if (this .superQueryParams) {'superQueryParams' ] = encodeURI (this .superQueryParams)'superQueryMatchType' ] = this .superQueryMatchTypereturn filterObj(param)searchReset (var that = this this .ipagination.current)onDateChange : function (value, dateString ) console .log(dateString[0 ], dateString[1 ])this .queryParam.classUpTime_begin = dateString[0 ]this .queryParam.classUpTime_end = dateString[1 ]onDateOk (value )console .log(value)
这样就可以实现具体的功能了。
本方法参考自:https://blog.csdn.net/qq_38215042/article/details/110875770
Tea标签页使用 这是一个选项卡切换组件
官方示例:
1 2 3 4 5 6 7 8 9 10 11 12 13 14 15 16 17 18 19 20 21 22 23 24 25 26 27 28 29 30 <template>
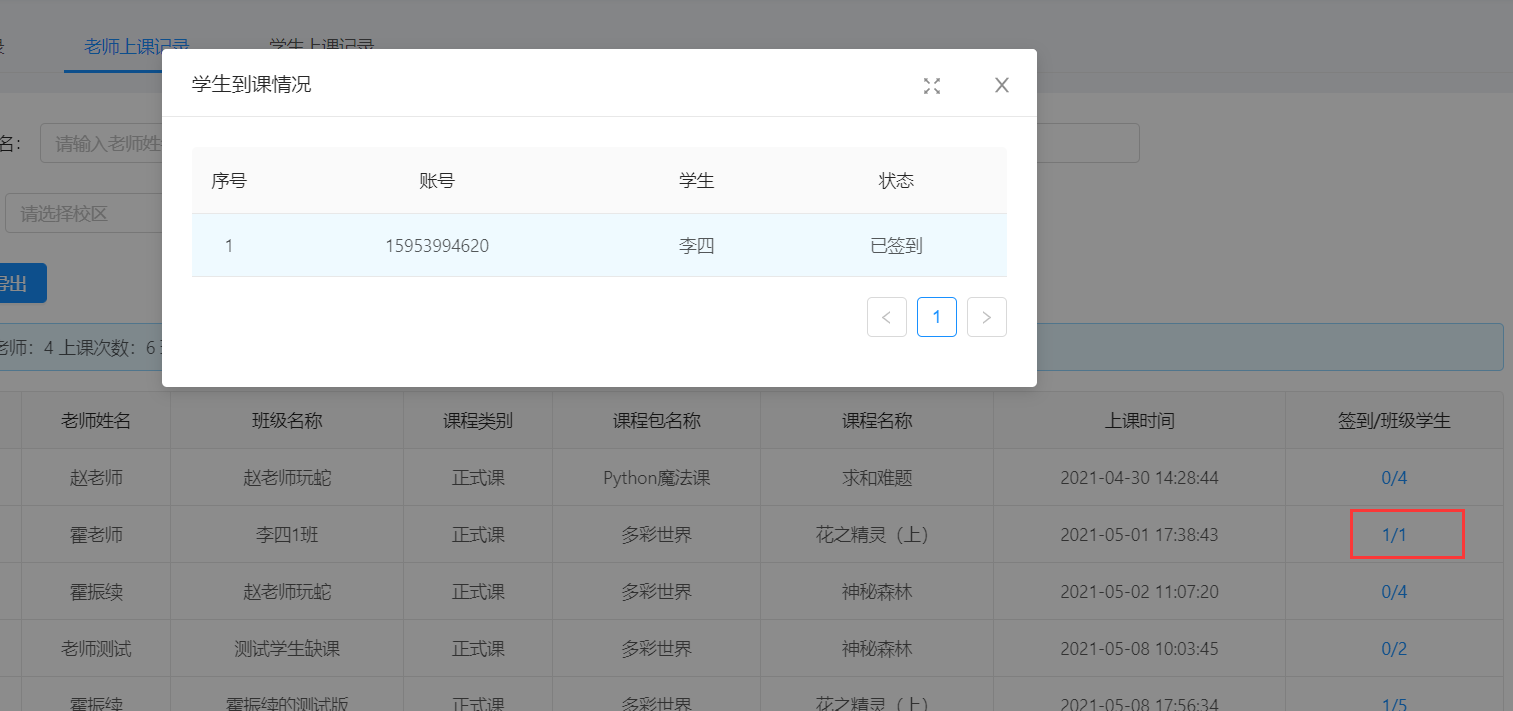
弹窗的使用 近期项目中遇到了一个功能,在查询老师上课记录的时候,需要显示出签到/班级人数,并且点击后会弹出一个对话框,显示出对应的数据。
效果如下:
特此记录一下,防止时间久了,自己会遗忘。
实现 先定义一个插槽,点击会触发弹窗的方法
<span slot="action" slot-scope="text, record">
1 2 3 4 5 6 7 8 9 10 11 12 13 14 15 16 17 18 19 20 21 22 23 24 25 26 {title : '签到/班级学生' ,align : 'center' ,dataIndex : 'peopleCounting' ,scopedSlots : { customRender : 'action' }handleTest (v )this .visible = true this .url.listCondition, {classId : v.classId,courseName : v.courseName(res ) => {if (res.success) {this .stuList = res.result.recordshandleCancel (this .handleClear()handleClear (this .visible = false
需要定义好的值
visible: false ,confirmLoading : false
在标签</a-table>的外面定义弹窗
1 2 3 4 5 6 7 8 9 10 11 12 13 14 15 16 17 18 <j-modal
定义弹窗里面表格的字段
1 2 3 4 5 6 7 8 9 10 11 12 13 14 15 16 17 18 19 20 21 22 23 24 25 26 27 columnstwo: [title : '序号' ,dataIndex : '' ,key : 'rowIndex' ,width : 60 ,align : 'center' ,customRender : function (t, r, index ) return parseInt (index) + 1 title : '账号' ,align : 'center' ,dataIndex : 'accountNumber' title : '学生' ,align : 'center' ,dataIndex : 'studentName' title : '状态' ,align : 'center' ,dataIndex : 'type_dictText'
其他调用对应的方法即可。
实现分页 默认使用的是 table分页,实现分页只需要加入一个配置即可
而 list 却不能这样使用
记录下 copy 别人的分页
<a-list :pagination="ipagination"
以上两个设置必须要有,第一个是分页设置的一个方法,第二个是数据源,及获取的地址
方法:
ipagination: {current : 1 ,pageSize : 8 ,showTotal : (total, range ) => {return range[0 ] + '-' + range[1 ] + ' 共' + total + '条' showSizeChanger : false ,showQuickJumper : false ,total : 0 ,onChange : function (page, pageSize ) this .current = page
watch: {'ipagination.current' : function (val ) this .loadData(val)
显示图片 使用img标签显示图片
<img :src="getImgView(model.schoolLogo)" />
getImgView()方法可以获取图片的路径
import {getAction,getFileAccessHttpUrl} from '@/api/manage' getImgView (text )if (text && text.indexOf("," )>0 ){0 ,text.indexOf("," ))return getFileAccessHttpUrl(text)
jeecgboot自动生成的页面不需要上述这一步也可以使用
因为它引用了
import { mixinDevice } from '@/utils/mixin'
JeecgListMixin中涵盖了此方法。
气泡式的卡片浮层 a-popover
文档:https://www.antdv.com/components/popover-cn/
文字提示气泡框 a-tooltip
文档:https://www.antdv.com/components/tooltip-cn/
Badge徽标数 a-badge
文档:https://www.antdv.com/components/badge-cn/
不定时更新~ 